Friday, April 08, 2016

Converting .pld file into .pll File

In 11i COnverting .pld file in .PLL File

f60gen Module=XXSYK_XDO.pld Userid=apps/P3pt1d3s@EUSD1 parse=yes Module_Type=LIBRARY

In R12 COnverting .pld file in .PLL File

frmcmp_batch Module=XXSYK_XDO.pld Userid=apps/P3pt1d3s@EUSD1 parse=yes Module_Type=LIBRARY

Thursday, April 07, 2016

No Data found or End of Report Printing in Report


It is similar to IF condition.
Say the requirement is to display “No Data Found  if the Report does not fetch any values” else it should display “End of Report”.
<?if:CF_COUNT= 0?>
*****No Data Found*****
<?end if?>
<?if:CF_COUNT != 0?>
   *****End of Report*****
<?end if?>
CF_COUNT is a formula column in the rdf returning the count of records returned.
Image

In & Out f XML Bursting

Oracle Bursting Mechanism enables us to deliver a single XML Publisher report/letter to multiple destinations simultaneously. This is a very helpful feature especially if you are trying to send the output of a report to an email address or multiple email address.The output is sent via email. User does not need to login to Oracle to get the report.
Picture1
Pre-requisite
1.SMTP configuration
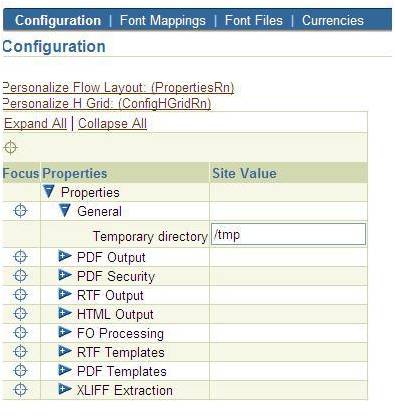
2.Change the temporary directory location.
  • A temporary directory has to be provided for XML Publisher engine to use for bursting.
  • Responsibility: XML Publisher Administrator
  • Navigation: Administration tab
Picture2
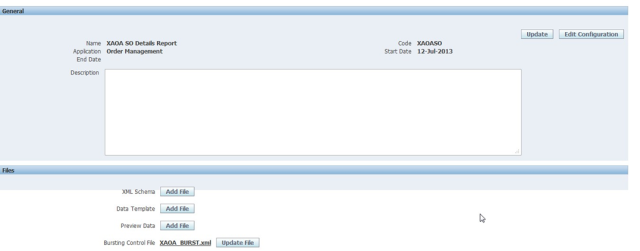
3. Attach Seeded Program to the Responsibility: XML Publisher Report Bursting Program
The following Bursting File needs to be attached to the Data Definition of the BI Publisher report that you are trying to burst :
<!–?xml version=”1.0″ encoding=”UTF-8″?>
<xapi:requestset xmlns:xapi=”http://xmlns.oracle.com/oxp/xapi”&gt;
<xapi:request select=”/PERSON/LIST_G_FIRST_NAME”>
<xapi:delivery>
<xapi:email server=”ATANML01.at.adsonydadc.com” port=”25″ from=“XYZ@XXX.com” reply-to =“ABC@XXX.com”>
<xapi:message id=”123″ to=“${EMAIL}” attachment=”true” subject=“Busting Report”>
Busting Report Body
<!–xapi:message>
<!–xapi:email>
<!–xapi:delivery>
<xapi:document output=”${EMPLOYEE_NUMBER}” output-type=”excel” delivery=”123″>
<xapi:template type=”rtf” location=”xdo://PER.XX_PERSON.en.00/?getSource=true” filter=””>
<!–xapi:document>
<!–xapi:request>
<!–xapi:requestset>
Explanation of the bursting template

XML Tags

Explanation

xapi:request select=This tag in the control file indicates from which tag/node in the concurrent program output XML should separated for bursting
xapi:deliveryThis node contains all email related attributes
xapi:emailThis tag contains the email attributes like,server or the email server IP or nameport or the email server portfrom or the email address from which the server should send the emailreply-to or the email address to which the replies should be sent
xapi:messageThis tag contains the attributes about the email like,To or the email address where the email should be sentSubject or the email subjectattachment , i.e. if the email should contain an attachmentThe mail body will be enclosed within the tags
xapi:documentThis node contains the attachment document and XML template related tags and attributes.The attributes in this tag are related to the email attachmentOutput or attachment file nameOutput-type or attachment file type
xapi:templateThe node contains the template information like,Type or the file type of the template
Attach the Bursting File to Data Definition
Responsibility: XML Publisher Administrator
Navigation: Data Definition
XMLBursting021
The bursting process is now complete.
Automatic execution of XML Publisher Report Bursting Program
Since the bursting program, XML Publisher Report Bursting Program, has to be run manually this might not be feasible for all users to use. The bursting program can be executed automatically if we use a rdf report to generate the data for the XML publisher report. In a rdf report we can add the following piece of code in the After Report trigger in the report to execute the bursting program as soon as the output has been generated by the report.
function AfterReport return boolean is
req_id NUMBER;
err varchar2(4000);
BEGIN
SRW.USER_EXIT(‘FND SRWEXIT’);
begin
req_id := fnd_request.submit_request (‘XDO’, — application
‘XDOBURSTREP’,– program short name
”, — description
”, — start time
FALSE, — sub request
‘N’, — argument1
: P_CONC_REQUEST_ID, — argument2
‘N’, — argument3
NULL, — argument4
NULL, — argument5
NULL, — argument6
CHR (0) — represents end of arguments
) ;
exception when others then
err:= sqlerrm;
srw.message(100,’exception ‘ || err);
end ;
if req_id = 0 then
srw.message(101,’failed to submit bursting program ‘);
else
srw.message(102,’request id for bursting program is ‘||req_id);
end if;
return (TRUE);
END;

Using XLS template for MultiPage Workbook in Excel

We can create XLS template rather than RTF template. This is very useful if we are trying to develop BI publisher reports with huge number of columns.
Limitations of Excel Templates
The following are limitations of Excel templates:
  1. For reports that split the data into multiple sheets, images are not supported. If the template sheet includes images, when the data is split into multiple sheets, the images will show only on the first sheet.
  2. There is no tool to facilitate the markup of the template with BI Publisher tags; all tags must be manually coded. Some features require the use of XSL and XSL Transformation (XSLT) specifications

Prerequisites

Following are prerequisites for designing Excel templates:
  • Microsoft Excel 2003 or later. The template file must be saved as Excel 97-2003 Workbook binary format (*.xls).
  • To use some of the advanced features, the report designer will need knowledge of XSL and XSLT.
  • The report data model has been created.
To code this design as a template, mark up the cells with the XDO_ defined names to map them to data elements. The cells must be named according to the following format:
  • Data elements: XDO_?element_name?
    where
    XDO_ is the required prefix and
    ?element_name? is either:
    • the XML tag name from your data delimited by “?”
    • a unique name that you will use to map a derived value to the cell
    For example: XDO_?EMPLOYEE_ID?
  • Data groups: XDO_GROUP_?group_name?
    where
    XDO_GROUP_ is the required prefix and
    • ?group_name? is the XML tag name for the parent element in your XML data delimited by “?”.
    • a unique name that you will use to define a derived grouping logic
    For example: XDO_GROUP_?DEPT?
    Note that the question mark delimiter, the group_name, and the element_name are case sensitive.

Applying a Defined Name to a Cell

  1. Click the cell in the Excel worksheet.
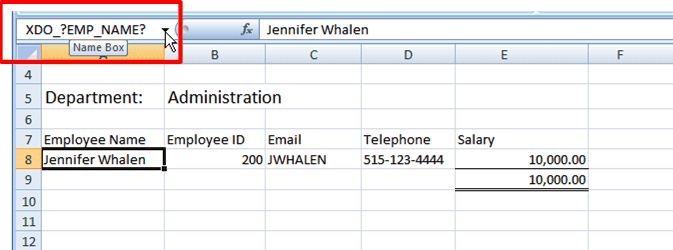
  2. Click the Name box at the left end of the formula bar. The default name will display in the Name box. By default, all cells are named according to position, for example: A8.
  3. In the Name box, enter the name using the XDO_ prefix and the tag name from your data. For example: XDO_?EMP_NAME?
  4. Press Enter.
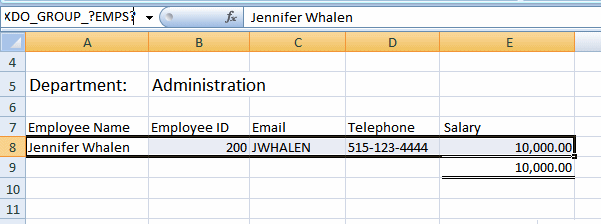
    The following figure shows the defined name for the Employee Name field entered in the Name box:
the picture is described in the document text
  1. For the total salary field, a calculation will be mapped to that cell. For now, name that cell XDO_?TOTAL_SALARY?. The calculation will be added later.
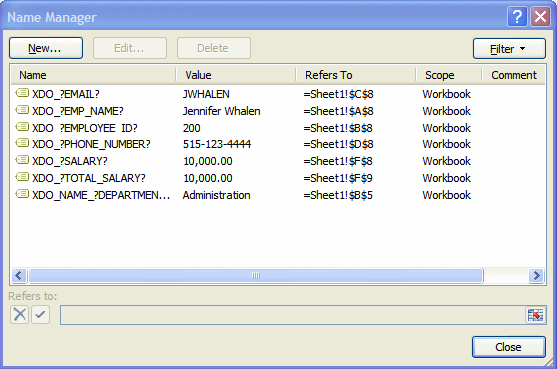
After you have entered all the fields, you can review the names and make any corrections or edits using the Name Manager feature of Excel. Access the Name Manager from the Formulas tab in Excel as shown:
the picture is described in the document text
After you have named all the cells for this example, the Name Manager dialog will appear as shown:
the picture is described in the document text

Understanding Groups

A group is a set of data that repeats for each occurrence of a particular element. In the sample template design, there are two groups:
  • For each occurrence of the <EMPS> element, , the employee’s data (name, e-mail, telephone, salary) will display in the worksheet.
  • For each occurrence of the <DEPT> element, the department name and the list of employees belonging to that department will display.
In other words, the employees are “grouped” by department and each employee’s data is “grouped” by the employee element. To achieve this in the final report, add grouping tags around the cells that are to repeat for each grouping element.
Note that your data must be structured according to the groups you want to create in your template. The structure of the data for this example
<DATA> 
   <DEPT>
      <EMPS>
establishes the grouping desired for the report.

To Create Groups in the Template

  1. Highlight the cells that make up the group. In this example the cells are A8 – E8.
  2. Click the Name box at the left end of the formula bar and enter the name using the XDO_GROUP_ prefix and the tag name for the group from your data. For example: XDO_GROUP_?EMPS?
  3. Press Enter.
The following figure shows the XDO_GROUP_ defined named entered for the Employees group. Note that just the row of employee data is highlighted. Do not highlight the headers. Note also that the total cell XDO_?TOTAL_SALARY? is not highlighted.
the picture is described in the document text

Step 6: Test the template

If you have installed the Template Builder for Excel, the BI Publisher tab will appear on the ribbon menu as shown in the following figure:
the picture is described in the document text
To preview your report using sample data:
  1. Click Sample XML. You will be prompted to select the sample data file.
  2. Click Preview.
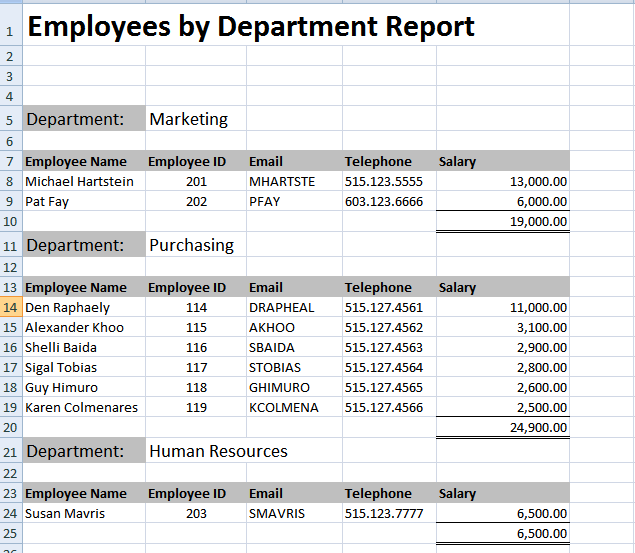
    The sample data will be applied to your template and the output document will be opened in a new workbook. The following figure shows the preview of the template with the sample data:
    the picture is described in the document text

To reference a parent level element in a child level table — BI Publisher

To reference a parent level element in a child level table, you can use the “../” notation.
For example , if you have a block Department and a child block as Employee
<?xml version=”1.0″ encoding=”UTF-8″?>
<!– Generated by Oracle Reports version 10.1.2.3.0 –>
<MPLDEPRICIATION>
<LIST_G_DEPT>
<G_DEPT>
<DEPT_NAME>Oracle</DEPT_NAME>
<LIST_G_EMP>
<G_EMP>
<EMP_NAME>Arun</EMP_NAME>
<ENO>1234</ENO>
</G_EMP>
</LIST_G_EMP>
</G_DEPT>
</LIST_G_DEPT>
</MPLDEPRICIATION>
Now to reference the value of DEPT_NAME in G_EMP group , we  can use the following
<?../DEPT_NAME?>
You can always use the absolute path to reference any extract element anywhere in the
template. The absolute path starts with a backslash “/”.
This notation goes up to any level for the parent elements.
For example the absolute path for the above example would be  /G_DEPT/DEPT_NAME
The absolute path syntax provides better performance.
If we have 3 levels of hierarchy then we can use <?../../DEPT_NAME?>

Clear BNE Cache for WebADI Changes

It Sometime happens that WebAdi Changes doesn't reflect once migrated in controlled instances. Here are the quick steps(Generally perfor...